Sunday, April 21, 2013

Is This Thing On?

Yikes!  Almost two months since my last post.  I have to say, I'm loving the "insta" part of Instagram, and it's kind of spoiled me out of blogging.

But I thought my newest project was worth blogging about.

My sweet husband recently deployed.  Right before he deployed, he bought himself an iPad, so he could stay in touch with us easier.  He has a little laptop, but it's pretty old, and therefore pretty slow.  Once he got his iPad, I knew I needed to make him a little pouch for it.  So I did!  Here it is...

I used some of Kelly B.'s wonky alphabet paper piecing pattern, shrunk way down for the FSU, and I used Essex Linen in Black along with some Florida State colors.


This is the other side of the pouch...


And a view of the zipper...


I was happy with how it turned out, even if it was a little snug.

Little did I know that at the same time he bought his iPad, he bought me one, too.  I found out after he had already left for his deployment.  His mom called to tell me there was a surprise under his nightstand - and there it was!  To say I was surprised, is an understatement.  What I was even more surprised about was that he had pre-recorded videos for me and each of the kids for us to watch whenever we want to.  Isn't he the sweetest?

Anyway, I love my iPad, and the pretty green protective case he got to go with it.  But I wanted a pouch, too!

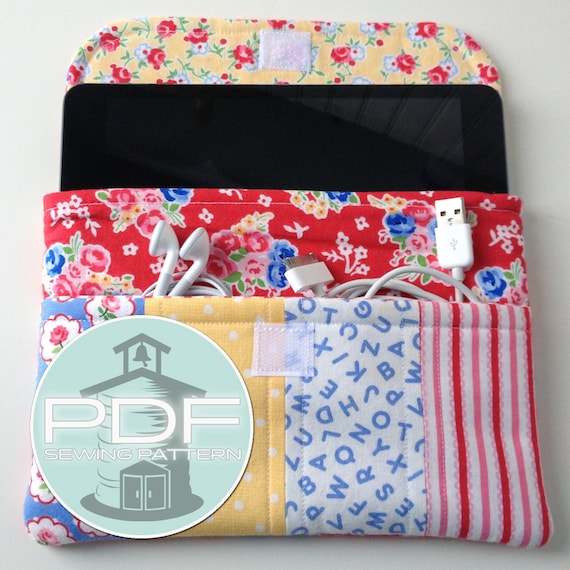
I had recently seen a pattern for a cute iPad pouch on Instagram, but couldn't remember whose it was.  So I started going through all of my IG friend's feeds to find it, and I finally did.  It was Cindy's (of Schoolhouse PatternseClutch pattern!  Isn't it cute?  I loved the pocket, and thought that would come in handy when traveling.  And one of the things that really made me take notice of this pattern, is the flap that goes across the length of the iPad.  It was just a nice little feature that set itself apart from other tutorials and patterns I had seen and made previously.

New - iPad mini sleeve case clutch sewing pattern - pocket - PDF INSTANT DOWNLOAD

I quickly bought it, and started my planning.

I realized that I needed to change the pattern up a bit, because I really wanted to use this charm pack of 2wenty-Thr3e, and a charm square isn't big enough for the strips needed for the front pocket.  So I decided to make the front pocket and the back exterior patchwork-y.  This picture doesn't show it, but I also quilted those sections, because every patchwork piece needs quilting, right?


Let me just say that the colors in this fabric line make me so ridiculously happy!  I'm so glad that I'm using it in something I'm keeping for myself!

I thought the 2wenty-Thr3e went nicely with Kona Curry and a gray and white stripe from Moda.  Here's the finished product...


I found that cute button at my LQS, and thought it would be a nice addition to the front flap.  It also covers up the stitching from the Velcro (because I forgot to add the Velcro when I was supposed to).

Here's what it looks like opened up.


The patchwork-y back that I just really love...


And a peek inside.  The iPad and it's case fit perfectly!  FYI - I thought that the pattern wouldn't fit my iPad with it's case on, so I made the pattern bigger and tested it first.  Once I did that, I realized that the original pattern would work just fine with the case, so I followed the patterns original dimensions when I made this one.


I loved making this pattern, and will probably make more of these!  They would make great gifts, and I might even make another one for myself (although I can't imagine I'd love it as much as I love this one).

The good thing about Cindy's pattern is that there are measurements for not only the iPad, but the iPad Mini and the Kindle, so it's very versatile!  If you've been wanting a pattern for a project such as this, I highly recommend this one!

Monday, February 25, 2013

VeloCity Baby Quilt

A girl from my church is having her first baby.  Because her husband is deployed, and she doesn't have family in the area, she actually moved back home to be with her parents during her pregnancy.  So a few of us from church are putting together a "baby shower in a box" for her, and my contribution is a quilt.  I don't know Abbey super well, so I checked out the Pinterest page she made for ideas for the baby room.  That's where I saw this painting she pinned.


I decided to try to find a fabric line with similar colors to those in the painting, and that's when I stumbled across VeloCity by Jessica Hogarth for P&B Textiles.  I had seen this line before, but never had a reason to use it, so I was glad the colors fit in well with what I was looking for - it gave me a good excuse to buy some of it!


And as far as a design for the quilt, I've said it before, and I'll say it again - inspiration strikes in weird places!  I was watching - of all things - a show on E! (don't judge me, please!), and during a commercial, there was a background of plus signs in different sizes.  So I sketched out a design, then went to cutting.  I'm calling this quilt, "Pluses Big and Small."  Here's the finished quilt front - 


 And back -


Here's the label -


For the quilting, I did continuous straight lines through all the pluses.  The areas that weren't quilted were a little puffy, so I knew something needed to go in those spots.  So I went with small scallops/clam shells.  This is my proudest quilting-on-a-home-machine moment!  And it was easier than I thought it would be.  Quilting those scallops in small sections made it very manageable, whereas quilting the whole thing on my little machine would have been a headache!  I love the texture created by both quilting designs.


And here's a shot of the binding.  I love the pop of green!


For the solid, I was worried about using a gray that would be too dark, and blend in with the dark gray print that I used.  I was also worried about using a white that would blend in with the white print I used.  So I went to my LQS, and started looking for Kona Ash, which they were out of.  But they did have this light gray Moda Bella.  I think the it's a perfect complement, because there are light gray elements peppered throughout a lot of the VeloCity prints.  

This one was hard to give away!  Thankfully, I have enough of the VeloCity left over, so one of these days I can make a copycat quilt to keep.

Another Emmaline!

Two Christmases ago, I made a Sew Liberated Emmaline Apron for my sister.  Recently, a friend asked me to make her an apron, so I was excited to dust off the pattern and give it another go!  She said her kitchen colors are red and yellow, so I went with that color scheme, using prints from Riley Blake's Apple of My Eye for the front and back of the apron, and a plaid print from Riley Blake's Avignon.


And just like I did for my sister, I made a couple of hot pads with scraps from the apron.


One of these days I'll make an Emmaline for myself!

Monday, February 18, 2013

Scrappy Trip Along!

I finished this quilt at the end of January, but I'm just now getting around to taking proper pictures of it and blogging about it.  So here it is!


I used a dottie backing fabric from Michael Miller that I found at my local quilt shop.  I bought almost enough to cover the whole back, but I was short just a bit.  So I added in a little section made out of scraps from the front.


I love how the quilting looks on the back.  In my last post, I mentioned that I was going to be using my friend's long arm, and that's exactly what I did!  Up until right before I started quilting it, I really couldn't figure out what design to use.  I had settled on using a pantograph that Marcy had, even though I wasn't totally feeling it.  Then, right before I started, she showed me the quilting she did on the ECMQG's QuiltCon Charity Quilt, and pointed out a little section of clamshells.  She suggested that as my quilting design, and - Ding! Ding! Ding!  That was it!  And it was easy to do, because I made each little curve fit into a square, so I really didn't have to put much thought into it.  I had so much fun quilting this and it went by so fast!  Here's a little more of a close up on the front.


As far as the binding goes, I was a little worried with what to choose.  There's so much going on in the front, that it would be easy to get a binding that clashes.  So I picked a print that I had used in some of the squares on the front, but in a color I hadn't used, and I couldn't be happier with it!  It's "On a String" in lime by Valentina Ramos for Robert Kaufman.  I also put a little patch of Michael Miller's Painter's Canvas in orange to mix it up a bit.


Here's a beauty shot of it.


All in all, this is probably my most favorite quilt that I've made, and I'm so happy that I get to keep it!  I snuggle under it every night while I'm watching TV.

It makes me happy.

Monday, January 14, 2013

Happy 2013!

The end of 2012 is kind of a blur!  I didn't get everything done that I wanted to, but I did a few extra things that made it okay to not finished what I had planned.  Namely, making these pillow cases to send to students of Sandy Hook Elementary School.


I found out about this on Flickr, but a quilt shop in Connecticut started this pillow case drive, and I jumped on board!  The Flickr group that I originally heard about this from is responsible for probably...well, I don't know how many.  But the quilt shop received pillow cases from all over the world!  They had to get the word out for people to stop sending them!  Over 6,000 altogether - that's pretty amazing!  I hope Newtown and the school realizes how much the world is behind them...is thinking about them, praying for them, and loving them.

As far as Christmas gifts go, I made a couple for my niece and nephew.  First up, I made a pillow cover for my nephew's travel pillow.  They take lots of road trips, so he actually uses his pillow a lot.  He's way into Lego Star Wars, so I found some flannel Lego Star Wars fabric for the cover.  I quilted it, and put in some piping and a zipper to make it a little fancier.  I have to tell myself that 10 year old boys, don't really care about fancy kind of things, so I tried to keep it simple, but wanted to add a few extras to it.  So here he is with his pillow.


My niece is really into dolls these days.  For my birthday last year, my husband got me the Wee Wonderfuls book full of beautiful dolls to make.  I chose to make her "Patchwork Penny" (but didn't have time to make the patchwork quilt to go with her...I'll have to do that later).  I tried to make her resemble my niece as much as possible, so I gave her blonde hair and brown eyes.  I also added in some freckles, because my niece has the most adorable freckles on her cheeks.  The freckles turned out a little wonky, but I guess that's okay.  And I gave her a green dress, because Jessica's favorite color is green.


Unfortunately, Jessica picked up a stomach bug on their Christmas vacation.  Here she is sleeping with her new doll, while recovering.  While I'm not glad my sweet little niece was sick, I am glad Penny gave her some comfort!


I also made some mug rugs for my oldest daughter's teachers.  I used this wonderful Paper Pieced Apple pattern by Charise Creates, along with some polka dots, Dick and Jane, and Punctuation fabric.


I realized after we gave them to the teachers, that I didn't take proper pictures of them - just these I put on Instagram.  Oops!

That was it for Christmas sewing!  I was supposed to make two more dolls from the book for my girls, but it just didn't happen.  As I realized my time was running out, I decided that they would be getting plenty of gifts anyway, so I can save the dolls for later.  My new deadline for them is Valentine's Day.

The New Year came, and I got swept up in the Scrappy Trip Along Mania that took over Instagram!  I just couldn't resist the idea of making something all for myself!  And the blocks were super fun to make!  I started out making 4 blocks every day.  Then one day, I made 9.  And the last two days I made 5 each day. I have a total of 30 blocks, and I am so in love with this quilt!


I started the quilting on it, but had to stop due to some tension issues with my machine.  Before I even started the quilting on it, I thought how much fun it would be to use a long arm on it (I got spoiled after making the quilt for John and Sarah).  I had to just step away from the quilt, but I took it with me to the ECMQG meeting this past Saturday, and our new president, Marcy, offered to let me use her long arm.  I'll definitely be taking her up on that offer in the very near future!

I also worked on a QuiltCon Charity Quilt for our guild.  We attempted to do it travelling quilt style, but it didn't go quite as I expected.  Instead of the quilt top growing as it went from person to person, we ended up with a lot of blocks.  By the time it got to me (I was last on the list), I was given two big pieces that were already sewn together, and about 5 other blocks.  As I was laying them out, trying to figure out how to put it altogether, I realized that I could just make one long strip, and then add fabric to the sides.  So regardless of the traveling quilt confusion, though, I am really, really happy with the quilt top, which I finished at our Sew Day on Saturday.  Our members added quite a few blocks that I'm totally in love with!


Marcy will be quilting this on her long arm, just like she did for our other Charity Quilt, and Kathleen will be binding it - again, just like she did for the other one.  I'm excited to see this completed!

I hope your New Year is off to a good start!  My sewing resolution for 2013 is to take it easier.  Make things because I want to make them - not because I feel like I have to.  What about you?

Wednesday, December 12, 2012

WiP Wednesday

Things have definitely been busy around here!  Can anyone say "Christmas Crunch"?  Every year, I tell myself that I'll do more in advance of Christmas, so I'm not making things at the last minute.  And every year, I don't follow my own advice!  Oh well.

Right now, I'm working on these mug rugs for Kendall's teachers.  My daughter loves her teachers, so I wanted to make them something special.  I thought it would be cool to incorporate an apple into something quilty, so when I saw Charise's paper pieced apples, I knew I had to incorporate those into mug rugs!  A while back, I bought some of this Dick and Jane fabric, but didn't really know what to use it for.  What better way than to use it for teacher's gifts?  I used some Punctuation for the back - again, what better use?  I just have to put the bindings on, and I'm done with these!


As far as other WiPs go, I need to make a pillow for my nephew, three dolls from the Wee Wonderfuls book (one for my niece, and the other two are for my girls), and a stocking for my little boy.

In recent finishes, I made this lined drawstring laundry bag (using Jeni's pattern) for a custom order.  A couple months ago, I participated in a craft fair.  I had one of these laundry bags for sale, and someone liked the bag, but she needed one in yellow and gray fabric.  So she contacted me after the fair, and we talked about fabric choices.  Here's the finished product (which I love, by the way).  I used fabrics from Simpatico and Bliss.


In other news, our family is sick, yet again!  Two weeks ago, Tucker and I went to California for a little visit, and I think he picked something up there or from the plane, and brought it home.  My middle one, Cami, has it the worst.  She's so pitiful, but looks so cute and cozy cuddled up under the Christmas quilt I made last year.


And Tucker is busy tearing up all the Christmas decorations.  His favorite thing to do is take apart the train tracks.


Kendall will be 5 (how is that even possible?) on Christmas Day, so we're busy planning her party.


That's it for me!  Check out more WiPs over at Freshly Pieced!

  WIP Wednesday at Freshly Pieced

Thursday, December 6, 2012

Prince Charming Rubik's Crush Quilt

In July of last year, my husband's brother, John, got engaged to a lovely young lady, Sarah.  That was also about the time we moved from California to Florida.  I was also pregnant.  It was also a quick engagement, because they got married a few months later, in October.  Right after they got engaged, I asked Sarah about specifics they would want in a quilt - size, colors, etc. - and after moving to Florida, I quickly got started. 

 Playing with the layout.  This was taken on 8/19/11, when we were temporarily living at my mom's house before we closed on our house.

I picked Ashley's Rubik's Crush pattern for the layout of the quilt, and ordered Tula Pink's beautiful line of fabric, Prince Charming, in the indigo and honey colorways, and Kona Snow for the neutral.  I had every intention of finishing this in time for the wedding, but...it just didn't happen.  I work well with deadlines, but realistic deadlines.  And with everything we had going on in our lives at that time (we didn't even move into our house until 3 weeks before their wedding), getting a queen size quilt done by October just wasn't realistic for me. 

First ECMQG meeting on 9/29/11.  I made some progress, but with only a couple weeks until the wedding, it was obvious I wouldn't finish in time.

After I passed the wedding deadline, I didn't really have a deadline anymore.  It just kind of became this quilt that I would finish...eventually.  So I worked on it here and there, with my husband nagging gently reminding me that I really should finish it sooner than later.  But again, I didn't have a deadline, so I wasn't totally motivated.

That is, until August when Sarah told me they would be coming for Thanksgiving!  I had my motivation!  I realized that my real motivation was giving them the quilt in person, as opposed to mailing it (they live in St. Louis). 

This was taken on 10/13/12 at a ECMQG Sew Day

With my butt kicked in high gear, I went to work!  Those little tiny 9 patches with borders almost killed me, but I pushed through, and finally finished the top in early November.

Taken on 11/4/12

Now that the top was done, the question was how to quilt it?  All along, I planned to use a long arm, because this was by far the largest quilt I had ever done, and I struggle even working with a lap size quilt in my tiny machine.  I'm sure with a lot of work, I could have done it, but I just wasn't up for the challenge.  Thankfully, a local quilt shop in my small town rents out time on their long arm.  So I reserved my day, and started thinking about quilting designs.

Then, my family got sick.  Well, we had been sick with colds, sinus infections, ear infections, etc. for a few weeks.  But then we got a stomach bug on top of it all.  And I had to reschedule my date with the long arm.  I started thinking this would never happen!  Plus, it was getting so close to my deadline, that I really started panicking.  What if something went wrong?  What if I couldn't finish before they got here?  What if...What if...What if?

The day finally came for me to use the long arm (four days before they were set to come), and the morning of, I still didn't know how I was going to quilt it.  I didn't know what I would be capable of, yet I didn't want to do a regular meander.  I thought about quilting each pieced block a certain way, and then the non-pieced blocks another way.  But again, I didn't know if I could pull that off, since I had never used a long arm before.  So Friday morning I woke up and started doodling.  I decided that I would do a kind of rounded square meander.

I got to the quilt shop, and got started.  I practiced a bit on the sides where it was just batting and backing and got the feel of the machine and the design I chose.  Then I took a deep breath and went to work!

Using the long arm on 11/16/12

I have to say, after all my panicking and build up and negativity, I really didn't need to be worried!  The quilting went really well, and I had so much fun doing it, and I was totally happy with the design I chose.  Everything just fell into place!  By no means is the quilting perfect, but I'm very pleased with the outcome, and totally want to long arm again!  And again...and again!

Close up of the quilting

All that was left to do was the binding and the label.  I finished the binding at the ECMQG weekend sew, which was the day after I quilted it!  Gotta love machine binding a quilt!

Here's the finished product (I realized that it's difficult photographing a quilt this big!):


Sometimes when I take a long time to finish a quilt, or spend a lot of time agonizing over one, I end up really hating the quilt.  But I actually really love this quilt, and I'm happy with everything about it!  John and Sarah are happy with it, as well, and that's the most important thing.